
Blog Starter kit Step-by-step
Hi there
Thanks for popping in.
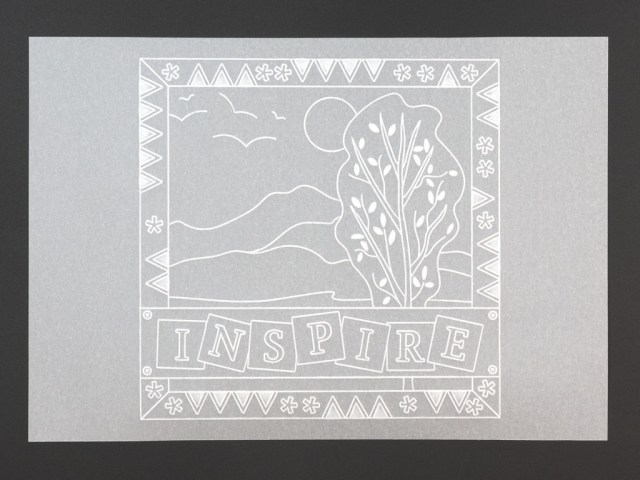
I will be showcasing the Groovi Starter Kit tomorrow on Create & Craft, because it is THE perfect starting place if you are wanting to get into parchment craft. For the benefit of the newcomer, here is a photo step by step of a card made by Tina Cox for us, using just what you have in the Starter Kit – bar the colouring pens. This card project is included in the pack too.
If you watched Paul in the Pergamano Show earlier today, where he was showcasing Linda’s clever layout plates, you’ll see the connection too. The first step in the Starter Kit project is to establish a layout!


Step 1
- Emboss the largest square with the No. 1 Tool
- Using the 4th and 9th squares from the outside, as guides, emboss a rectangular panel
- Emboss the 3rd Square from the outside, remembering to miss out the rectangular section
- Emboss diagonal lines from corner to corner of the double outlined square to give the impression of a frame

Step 2
- Emboss the tree and branches with No. 1 tool and the leaves with No. 2 tool
- Emboss the landscape and sun with the No. 1 tool
- You are working on the back of the art.

Step 3
- Using parts of the small moon, emboss the bigger birds and the distant small birds from the ‘V’ symbol next to the flower symbol
- Emboss in the double outlined squares the symbols ‘V’ and * (flower/asterisk shape)
- Emboss the symbol, circle with a dot, in the 4 corners of the rectangle

Step 4
- Emboss the square tiles starting with the 3 in the middle of the rectangle panel followed by 2 on either side
- Emboss the letters I N S P I R E in the tiles, remembering to spell it backwards, because you are working on the back of the art.

Step 5
- Use the soft side of the mat included. Emboss the leaves starting with the No. 4 tool working down to the No. 2 tool gradually and gently to get white embossing. Between layers, let the parchment rest.
- Emboss between the straight lines of the square and the triangles with the No. 4 and No. 3 tools to create shading.
Step 6
- Colour on the back of the work with Distress Markers or Perga Colour pens.

- Trim you work back,
- Mount your work on the back side of a piece of Northern Lights designer paper using brads,
- Layer up on the FRONT of a sheet of the same
- Attach to a black cardblank.
All available from Claritystamp and The Craft Store.

Thanks for reading. If you’re looking for a crafty pastime, which is very beautiful, clean and achievable, then Groovi parchment art may be just the ticket for you. Give it a go. Thousands of people are feeling the mindful benefits of our Groovi art. Maybe it is just what you’ve been looking for.
Love always
Barb xxx
9 thoughts on “Blog Starter kit Step-by-step”
That’s fab Barbara! You’ll rock it tomorrow.
Enjoy!
Love and hugs. Xxxx
A busy day ahead but I am sure your new audience will love the Groovi System & the Corner stamps. Can’t believe its 14 years since I discovered Clarity !!
Not sure about the 3/4 hour programs – not so easy to follow without watching 24/7 & less demo time for the guests.
Will be watching tomorrow
WOW. I’ve seen the starter kit through fresh eyes. What a difference from the first Groove to the last. Just goes to show what colour can do to enhance a piece of artwork. Thanks Barb, you rock and tomorrow you will sell out all over again. You at Clarity are going to be so busy – Pergamano today, Groovi tomorrow xxxxx
Groovi is definitely a Mindfulness craft – easy to get “lost in it” and switch off from all the stuff going on elsewhere! I’ll be watching the C&C shows tomorrow Barb, you’ll blitz them as usual! Really looking forward to the later stamp show and some “old friends” – the Clever Corner sets! Pattern building rocks, and so do you!
Hi Bard
Beautiful work with the starter kit..really enjoyed the Shac today can totally relate the the washing machine mind…I’m like that most days..I Craft to distract myself nothing else seems to work..thanks for all the crafty hours..
I am so glad the starter kit is taking centre stage again. I have heard so many people say they can’t see much use in it. I reckon it is the most useful part of the whole Groovi system, and can be used for so much. The punctuation alone can create the most beautiful little flowers. Have a great show. You will rock it to them. xxx Maggie (Silvercrafter)
Loved this just using the starter kit. There’s nothing worse than buying a starter kit only to find you need additional ‘add ons’ to complete a certain project for the first time. Have a great time at create and craft you will smash it xxx
All change!! Shall be watching Create and craft shortly. The starter kit is key for those wanting to get into the craft of course, all you need to get going. Good luck Barbara.
Wouldn’t be without my starter kit if only for the plate mate. Makes life so much easier to use with smaller A6 plates and spacers too. Worth every penny. Was unable to watch today but all recorded for later.
Safe journey home.