When it goes wrong but right…
Hi there,
Thanks for popping in. You know how it is when you craft. Sometimes, you have a great idea, but it doesn’t work out at all as you imagined it, right? Then other times it doesn’t work out at all as you imagined it – but even better! Happy accidents we crafters call those occasions. I had one this morning, whilst prepping a little step by step for today’s blog. I was wanting to use Gold Wax…
Out with a fabulous festive stencil and a little relief texture paste first. Used the Black coated Clarity stock – very classy.


Let it dry completely, andwash the stencil as soon as possible in warm soapy water.


Replace the clean stencil on the dry texture wreath, and secure with masking tape.

Now for a little of the Inka Gold gilding Wax. Scoop a little out of the pot onto a piece of paper or a blending mat. Use your finger or a sponge to rube the gilding gold into the exposed wreath. Look! beautiful! The stencil not only protects the black card, but also the raised sides of the paste. So cool!


So far so good. I love this Inka GOld. I bet it would work beautifully on pottery, on ceramics. I shall have to investigate when I get more time. (Puts set of Inka Gold colours in Pottery Studio downstairs. Studio’s coming along very nicely. Big reveal imminent…
Anyway. Back to the step by step.
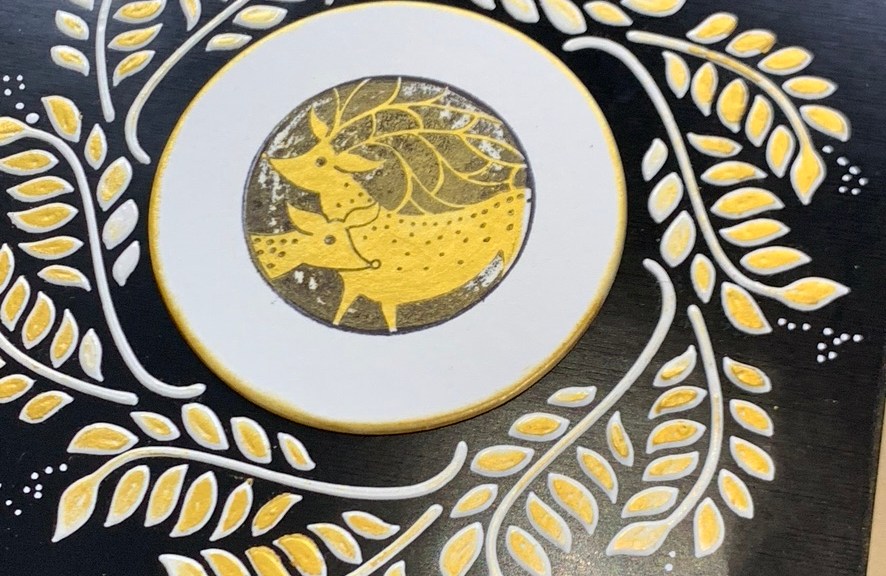
So here’s the thing. I wanted to add one of those lovely round Christmas stamps in the centre on Stampboard. The smallest round stampboard fits like a glove. The deer, in fact. But. I also wanted to paint the deer gold. No chance. Have you seen how fine the antlers are?!?

How about adding a layer of gold UNDERNEATH? Before you stamp, Gray? Give it a go…it’s water soluble and made of beeswax, so what can go wrong?

Perfect. I used a water brush to paint a circle of gold onto the stampboard, which was about the same size as the stamp. Fried egg, anyone?

Let it dry, then stamp over the top with a black Archival. Shucks. The stamp lifted the gold back off in places.

Ace! Perfect! Ideal! Really gritty, earthy, grungy! Love it! And the deer are gold – just as I pictured, except the background is much better. Very happy accident.

The stamp and stencil cleaned up easily with water.

Let’s put this Inka Gold through its paces then. We’ve rubbed it on dry, we‘ve added water and painted with it. Now let’s sponge it onto the side of the stampboard.

Now let’s trim back the black card and sponge it along the edge too.

It works on wood too. It’s used to distress furniture and gild frames. I like that it is beeswax based.


Want to spruce it up a little more? Add a little ping? The new white Posca pens glide like silk on the glossy black card. I mentioned them in the SHAC yesterday. They are superb. I would like to do a doodling session with you using them soon, so treat yourself. We have finally got them in Apparently, since lockdown they are like hen’s teeth.


Go a bit carried away with the white dots! But it does lift the black!
If you fancy the gilding waxes, there are 4 colours.


The haematite blue is fab too. Let’s have a little bloggy offer. CLICK HERE. We have a limited stock of these; when they’re gone they’re gone.
Any, that’s it for today.
Keep calm and carry on crafting!
Barb xxxx
Love and Hugs
26 thoughts on “When it goes wrong but right…”
Hi there, You won’t have time to play in the pottery studio as of tomorrow! You’ll be far too busy cuddling kittens!! Lol. Thanks for this demo, Barb. I bought Inka gold from you last year, I think it was, but have had no idea what to do with it. Having a rubbish day so will turn my attention to more pleasant things, like crafting! Anyone who works with people should get a medal!!!!!! Rant over! Have a good weekend and a safe trip tomorrow for you babies. Looking forward to lots of photos on your blog tomorrow night! Hxx
Oh Barb that came out a treat! I think the posca pens are the staple for those that paint stones, possibly why they are in huge demand and difficult to find. Now I was wondering what to buy with my poscas, silver one for me! Do you think it would work on top of waxed chalk paint? I have an idea to brighten up some upcycled nest of tables and rocking chair painted in duck egg blue? The tables have an ornate edge bit rubbed on in a distressed fashion and bling ready for Christmas!
Wow! That looks fabulous! Happy accident indeed!
Hope you enjoy making your home kitten friendly today and have a safe journey tomorrow!
Love and hugs xxx
Wow that looks great! Looks simple but is quite a technique to get it all work like an accident!
Wow great demo. Safe journey tomorrow when you go to collect the little ones x
Really informative blog and looks so good. Hope you enjoy your new additions though I do worry about all the lovely birds you have in your garden. Savage will have to put them in their place.
Best wishes x
Fabulous step by step thank you and so many uses will give this a try xx
Barbara hab spass mit deinen zwei suessen
Beautiful project ! I had a lovely big parcel of goodies this morning, hubby said ‘bet that was more than the voucher you had’ it was a bit ! Enjoy your kitties tomorrow ! X
Wow! Barbara this is so beautiful, love, 💘 love it so much xx
Great happy accident! I’d give it a try, but both my tubs of paste (the ReliefPapierPaste and the InkaGold) have dried up solid – it’s so frustrating, as I’ve always been very careful to keep the lid tightly closed when not in use. Is there any way to revive them? Would adding water work, do you think?
I’m so looking forward to hearing all about Erik and Ragnar and their new adventures chez Gray – we rescued two feral kittens that were abandoned at the edge of our garden a couple of years ago, and what joy they brought to the house! Sooty is a great big ball of dark fur, and very nervous of strangers, but very affectionate with us; her brother Sweep was a tiger-stripe, sleek and swift – and very much a hunter. His was only a short life, unfortunately – his too-adventurous soul used up his nine lives all too quickly – but we believe it was a happy one, and we remember him fondly.
I mixed my Inka with beeswax furniture polish to thin it for a particular effect but it would be cheaper to buy another with the offer. Furniture polish smells of turps, so you might get a bit of movement with that. Try putting a tiny bit in something and mixing them?
I’m told all texture paste is PVA mixed with powder the consistency of talc. I think once PVA is set you can’t revive it. I think adding water will just give you lumps but you’ve nothing to lose.
There was a product called Magic Powder that you could add to any ink or paint to get texture paste. You might be better with that, if you don’t use much as you can mix it as you go along, so it won’t dry out. Maybe Barbara has it but with a different name? It is worth e mailing Clarity to ask.
Thanks to Ali and Janet for the tips, I’ll give it a try.
I added about a tablespoon of boiling water to a paste that had dried up (not Clarity but very similar, water-based) and it worked pretty well. Have tried adding it to dried-up relief pastes too but it didn’t work. They too were a different brand so if they have had it, there is no harm trying the boiling water.
Love the demo – the Christmas rounds Groovi plates arrived yesterday, already have the stamps but no idea where the stencils are so will have to go on a hunt.
Ordering the pastes and pen in a minute.
The mixed media stamps will be jumping into my basket on Friday, they are gorgeous.
Stay safe
Please show us your kittens soon I’m cat mad only have one but we love him to bits x
Very lovely. My club goodies arrived this morning but will have to wait with the other months editions until I’m reunited with all my craft supplies. Meanwhile I bought an embroidery kit yesterday to keep me busy – haven’t done proper embroidery since school when my eyes were much better. This might take some time!!!
Great project, love the grungy background of the stamp too. My club goodies arrived this afternoon they are all perfect thank you. XX
Thank you, Barbara. I’ve only added little bits to embossing or raised images and polished them before. I mix all the colours adding one at a time so it’s patchy or just a different colour. But I polish like mad to stop it coming off again. I’ll have to be more daring.
A great demo Barbara!!!
Love the gold on that shiny black cardstock and it looks like a Chinese cupboard decoration.
Have a save trip tomorrow and enjoy the little furry balls!
Lot of love Trijntje Huppel
This has been added to my must have a go list as I have all the components, thanks for the step by step.
Now back to the task of finding as many words as possible from Pergamanoandgroovi !!
That’s just lovely. Will have to have a go at that – my Christmas rounds stamps have just arrived today!
Hi Barb,
Fabulous step by step and a very happy accident! I love texture paste although I haven’t tried the one you use – I have too much of another brand to use up first. I haven’t tried the Inca Gold yet might just have to now though ( if there’s any left). I have used other gilding waxes but never seem to have much success, I think I’m a bit heavy handed and always seem to get smudges! Enjoy your little kittens tomorrow, looking forward to seeing some photos of them. Love and hugs,Alison xxx
Hello
Waiting for my stamps to arrive then i will be trying this technique, loved all the sharing of knowledge thank you xxx enjoy your kittens
Hugs xxx ps thanks for the bloggy offerx
Hi Barbara
Thus is gorgeous, what a happy accident! Love the effect of texture paste on black card. I’ve tried Matt black but not shiny black, I must have a play. Looking forward to seeing the big reveal!
Love Diane xx
Wow Barb, how beautiful, love it when you do R & D on our behalf. Take care and stay safe everyone. Bx