
A Brand new Compendium of Doodle Stamps by Tina coming up!
Hi there.
Thanks for popping in. Thought I would share something very special which is coming up on HOCHANDA TV imminently….
A while ago, the ever clever Tina Cox designed a collection of fabulous doodle flowers and dragonflies and funky birds for our Groovi-Go! Parchment set. Remember? Let me go find the plates for you on the website…..ahhh. Here they are.

Well. So many of you requested these images as stamps, that we finally went ahead. And our Maria, (aka Stamper extraordinaire), is launching this comprehensive and impressive set on Wednesday at 12 Noon.
It’s a stampset with loads of individual elements, just like the Groovi plates actually. So rather than just shout about it, I decided to have a play today, use a few of the elements, and just familiarize myself with what looks to be a superb scene building set. I really wanted to have a play with the birdies, but nope. Twas not to be. The birdies did not come home with me.
But you can see from the ones I DO have, what the game is. Interchangeable flowers, centres, leaves, branches – it is endless!

Let’s have a look, shall we?
Found a scrap from the TV show last week, and decided to use that.

Let’s start with the flower centre, the plain ring. Now that’s a thought. I can do a little step by step on a gemstone. I promised to do a Youtube, but that didn’t pan out this week. So this will do. There are loads of Youtubes already on that technique – and some are very, very good too! How do you think I learned them ?! Right Black Archival ink pad.

Pick a flower and frame the little circle.

Add a stem.
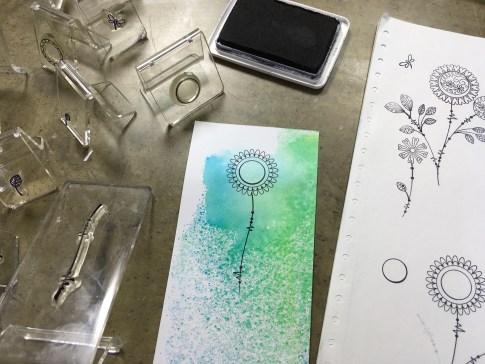
Build your design. There are leaves and branches galore!

When you think you have done enough, it’s time to bring the pic to life by injecting colour.

Let’s start with the flower centre….Use an eraser to take out some of the background colour before we begin.

I used Perga Liner B-Pencils. B for blending. Light in the middle (yellow) Dark around the edge (blue), Medium in the middle (light green). And let’s face it. That blue will turn green as soon as it touches the yellow anyway!!! Small circular motions with the pencil.
The secret to effective gemstones is a gradual build-up of colour.

Use a dark colour, a blue or black even, to draw faint cracks in the stone.

Now it’s time to blend. Enter our new blending pen. What a brilliant addition to any craft stash this is! You can even use a dry nib to gently blend the colours. Small circular motions, working from the lightest area into the darkest. Add a little more depth around the outer edge and blend it. If you like, you can add the tiniest amount of Dorso oil to the nib, and smooth out the blended colours with it. Allow the oil to dry before you go in again with more colour.

Time to add colour to the rest of your design. It’s the same principle for the rest of the colouring in process.

Work your way through the flowers, petals and leaves….

The word Faith came up this morning, during an early morning coffee with friends. Faith and Acceptance are key, don’t you think?

And now for the white pen which will transform the flower centre. It is the white Gel pen which transforms the gemstone from a flat centrepiece into a 3-D centrepiece. I didn’t overcook it in this flower, because it’s a flower, not the Crown Jewels! But you get the idea.

A few little highlights here and there with this Pergamano White Gelpen.

I tell you. This is the BEST highlighter pen I have ever used. And who knew we would own the company ?!?!?

Layered up on black to make it pop, and we are all done.
So that, my friends, is just a little taster of the potential of this Tina Cox Compendium of Doodle Stamps, which Maria will be showing off and launching on Wednesday. And if I know Maria, she will blow the doors off with her demos – she always does.
12 Noon and 4pm. HOCHANDA
SKY 673 (24/7) FREEVIEW 85 (6AM-7PM) FREESAT 817 (24/7)

Love & Hugs,
Barb
xxx
24 thoughts on “A Brand new Compendium of Doodle Stamps by Tina coming up!”
Good evening Barbara! That’s gorgeous!
I loved playing with this set and there are lots of possibilities with the stamps. And they work so well with so many other stamps and stencils too!
I’m really looking forward to seeing what Maria does with them too!
Have a relaxing evening. Love and hugs! Xxxx
Fabulous card, loving the look of the elements in this set. Have been playing with my overlay stamps again today. They haven’t been away since they arrived. Xx
Evening bloggy friends hope everyone has had a good Saturday. Sending love and hugs. Xx
Hello Donna, clothes shopping with our daughter today, oh boy are we exhausted!, sending hugs xxx
Hi Donna sending hugs xxx
Oh wow! It’s super!
Oh no, more fabulous stamps – I may have to sell my body!! Lol. Gorgeous sample once again Barb – and of course you are right – Maria will knock it out of the park!! Xxx
😀
Lovely artwork, great advice on colouring in, i must make time to get some practise in xx
Wow brilliant another item to add to my list for the open day on Friday eeeek
Hi Barbara
What great stamps, I think Maria will have some fabulous ideas with them and I’m looking forward to seeing the samples from the design team. It’s so good to see close ups of your colouring tecniques and get a master class from an expert. Love the finished sample, isn’t it pretty. Just read yesterday’s blog, aren’t the birds lovely and what a great idea putting them on a log from the pear tree. You do tell a good story. Enjoy your evening.
Love Diane xxx
Sending hugs xxx
More for my list the look great lots variety in pictures to do xxx
Hi Barbara and everyone, hope you are all well and have had a good day.
I loved the groovi ones but am loving these stamps, love the colouring in and the gel pen looks great 👍 a must have on my next order. Thank you for the tips on colouring in. Looking forward to seeing Maria’s shows on Wednesday.
Lynn xxx
Brilliant. Wonderful step by step. Of course I shall need these stamps, reckon they will be like my journal set always in use. Hope you got plenty for Open Days. xx
Will definitely be looking in. I love stamps which can be built up and are so flexible. Love the gemstone centre to your piece too.
Loved the bird story yesterday. Husband has threatened to lock me in the garden shed without a tele or computer if I buy more stamps so I will behave – for the time being!!! I know there will be future ones I won’t be able to resist. Your colouring ideas have proved inspiring. The original Perga colouring pens I bought years ago were single nibbed and very broad, only good for larger projects but with the new double ended ones all are getting a lot of use.
Stunning so beautiful thank you for the step by step xxx
Sending hugs to all on the blog xxx
You have done a beautiful piece of colouring and love the highlights on the centre, and it really does look like a gem, so shiny and pretty. These stamps will fly, and Maria will be great and hope to be able to watch on Wednesday. x
Beautiful, love these new stamps Can’t wait to see more. Tina is such a clever designer
Hello Barb, well you have done Tina’s designs justice with this step by step. As you say the possibilities are endless. Take care everyone. Bx
Those are right up my street! Can’t wait to see what Maria does with them x
Beautiful work as always. Love the gem in the middle xx