
A Blue a Blue a Ballooooon….
Hello there!
Thursday’s blue right?
So let’s get the old Gelli Plate out and make a cool blue frame..
Here’s how:
Gelli Plate
Square white card
Titanium Buff Acrylic paint
dark blue acrylic paint
turquoise acrylic paint
brayer
Oval Framer Stencil (Set of shapes)
Dotty wave stencil
Leafy Swirl stencil
Willow Adirondack Ink Pad
Stonewashed Adirondack Ink Pad
Watering Can Archival
Stencil Brush
fine black Micron pen
Distress Markers
If you are a Claritystamper, I bet you’ve already got most of this…
Lay your Gelli on a piece of square white card,
for lining up the top piece in a minute.

Spread some Titanium Buff Acrylic paint over the plate with your brayer, and lay the oval centrepiece stencil into the centre of it!
Then lay the Dotty wave stencil over the top.
Copy paper next, so you can apply pressure

Lift off the copy paper and the Dotty Wave,
but leave the oval in place when you pull the print.
That way your centrepiece will be lovely and white.

Now for some dark blue…
But before you start on the next layer of paint, attach the oval centrepiece to the actual art work with some masking tape or blue tack where the white oval is now, all ready to set down in the wet paint. Spot the blue-tack..


Spread the blue ( I think I used a little turquoise here, too)
with a brayer.

Lay the Leafy Swirl stencil into the wet paint, then a sheet of copy paper next, blot well and lift off the copy paper, so it looks like this.
Now remove the leafy stencil.

Provided you have covered up the white oval with the oval centrepiece, when you lay the artwork with the dotty pattern down, rub and lift, the oval aperture will still be there.

So now we have a fab frame, all ready to fill!
Always happy when this happens, too. Still got a bit of the pattern on the Gelli Plate? Let it dry, and we’ll come back to it….

Let’s add a little shade with Stonewashed and a
make-up sponge first. The oval mask helps of course!

Now we can begin….

Stamp the Hot Air Balloon in Watering Can Archival

Cover up the outside with the framer.

Use the brush with Willow and Stonewashed around the
edges of the oval.

Build up the colour by going round and round and round
with the tip of the stencil brush

Add the smaller silhouette balloon.
Perhaps ink blot plot, so that it’s not so dark.

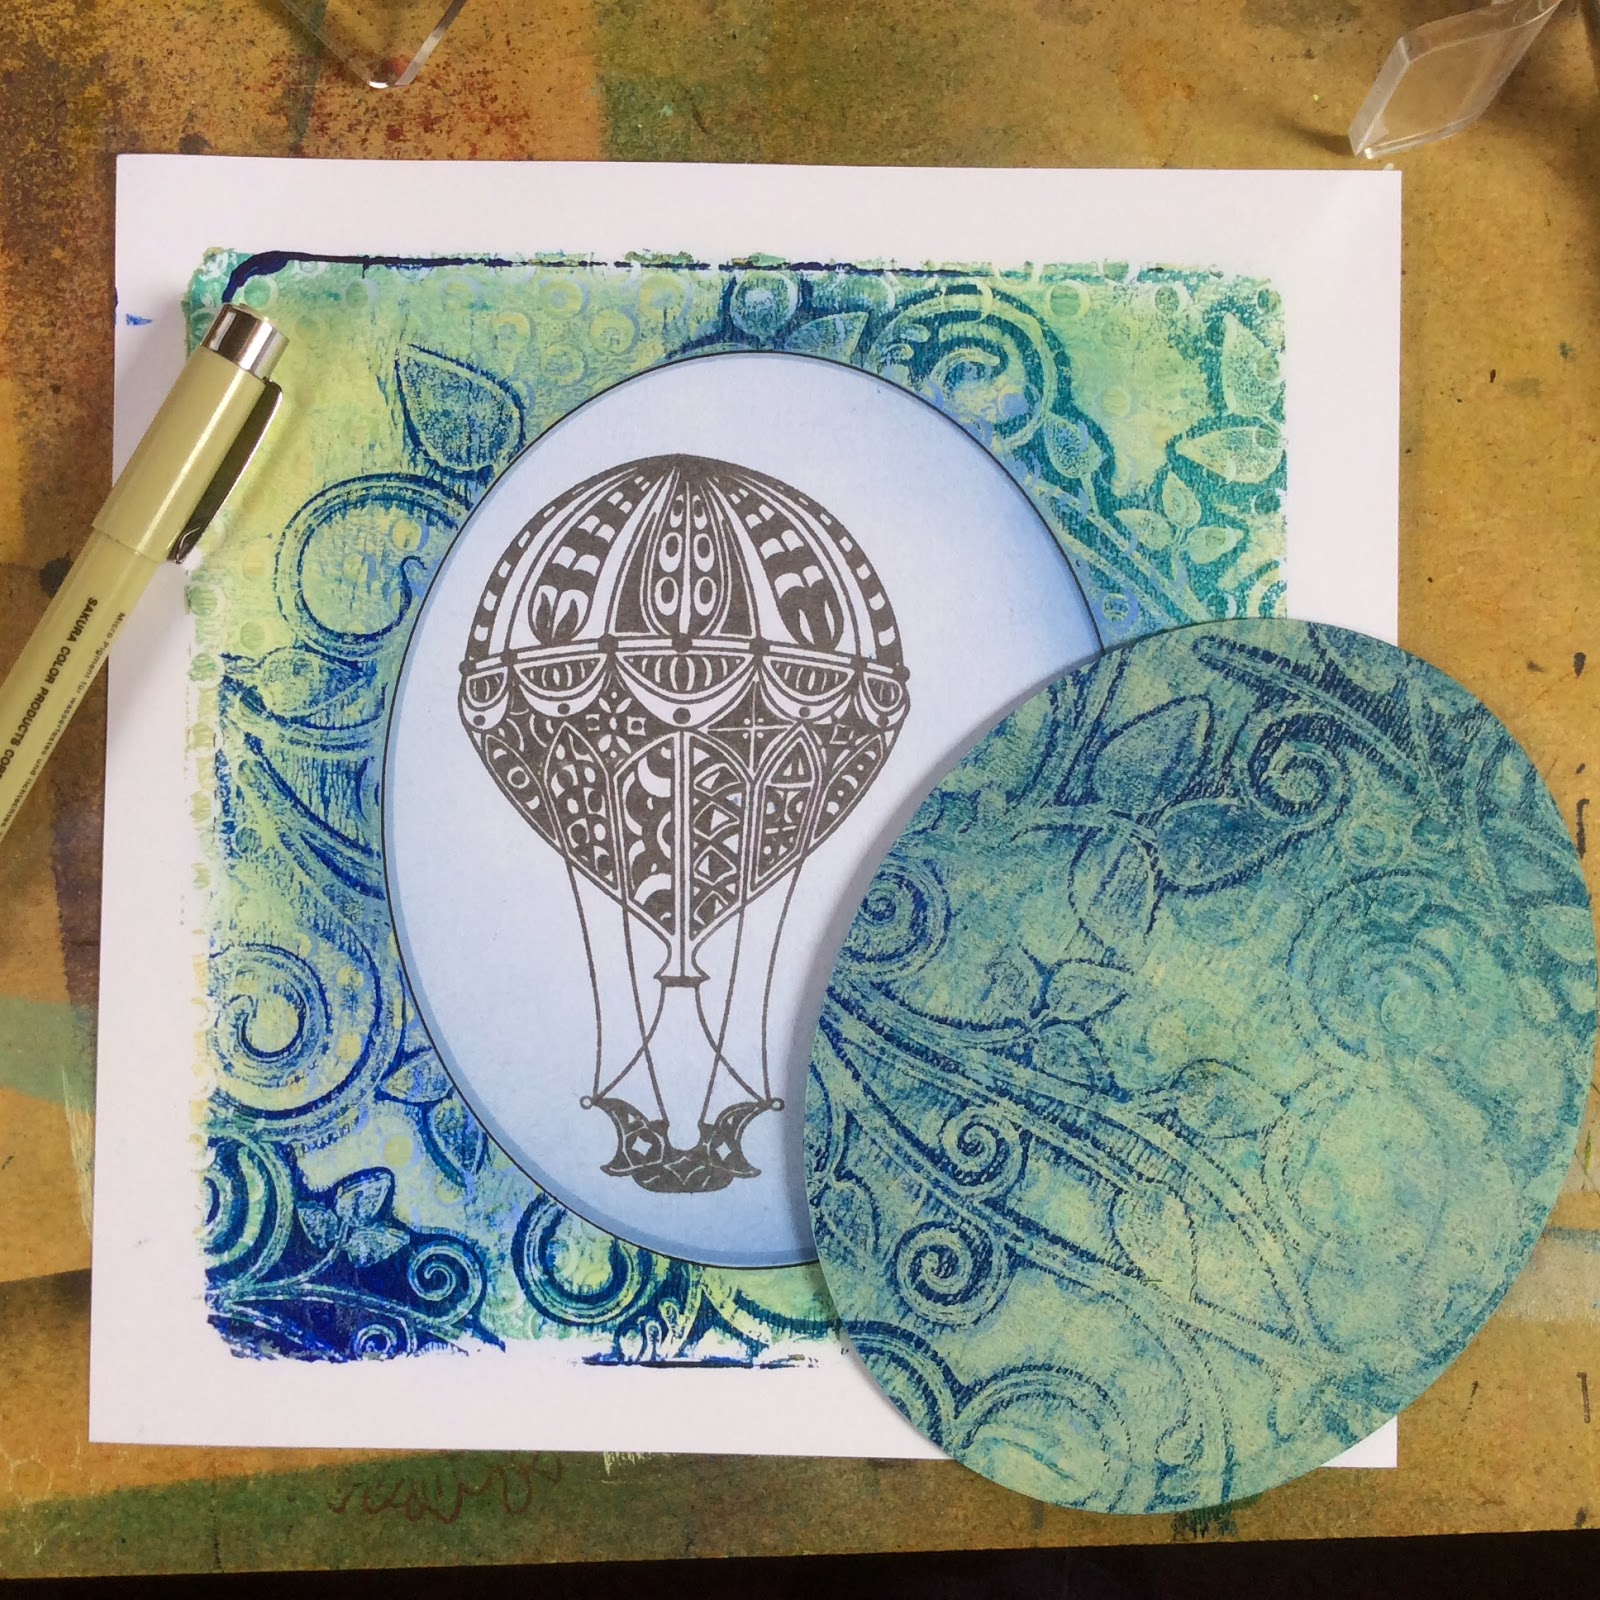
Draw around the oval with a fine black pen.

Colour in the Balloon with Distress Markers

Nice!

Hang on though! Remember this?
Add a little Buff Titanium Paint straight on top.

Bluetiful!!!

Arty backdrop made from the leftovers.

There we are: two in one…

The Gelli Plate Rocks!
Thanks for dropping in.
with love,

59 thoughts on “A Blue a Blue a Ballooooon….”
I can't wait for my balloons to arrive to have a go at this one. Then it might be lesson two for Bec and Merlin. It is such a detailed tutorial, it is almost like having you in the room. xx Maggie
Maybe a bit too long, but more pics than words….x
Only too long for you to have to compile, Barb! 🙂 Perfect for those who are trying to emulate your work! Looking forward to the arrival of my balloon stamp even more now… Love 'n' hugs xx
Definitely not too long. It is extremely helpful!
I'm with Eric and SarahS … It's perfect!
I agree – definitely NOT too long for us. xx Maggie
Such a beautiful card, this stamp is so lovely to work with …there is a lot more to it than meets the eye. These tutorials are so useful because we can refer back to them and follow step by step in our own time .. I just had my seahorses today and I know I have your blog to refer back to on my laptop in my craft room ..it's wonderful …just need more hours in the day like everyone else who crafts xxx Annie
Awesome, I hope my stamps are there by the time I return can't wait to try this. Awesome…nice jiob!
Tutorial too long!!!….NEVER!…. You explain it so well, like a good recipe book Barb, you take us step by step, so if we follow we can go back to the exact point – theres a thought for you – a book of tutorials, think about it – you won't have to do much as you already have so many from this blog!! I love this balloon – its Around the World in 80 days era, I love the frame too – I had the small gelli for Christmas – already had the bigger one but think I will use the smaller one more! So when I get my balloon I will be trying this one for sure xx As ever a blog that is a delight to read x
Such beautiful arteork and great step-by-step instructions. These tutorials are never too long when many of us are learning new techniques.
Morning Barb…cuppa time again and no it's not too long!
I agree with you that it is a beautiful balloon…I love the shape and the patterning. Kim is right about it being an Around the World in 80 Days balloon.
I had my Gelli Plate out on Sunday and couldn't pull a print I liked. So I went back to basics and I was away….I now have a stack of gelli prints all ready for me to turn into projects!!! Love and hugs to you. xxx
Hello Barb, fab step by step instructions, as I am still getting used to my gelli plate, but loving it. These 2 examples really make me want to go play and forget about work, they are amazing. Don't have these balloons, both have the original set of 3, so am going to try with those. Have a great day. Bx
Beautiful and such a wonderful detailed tutorial. I haven't got the stamp, but I have got the Gelli plate and stencils, so can improvise. I did enjoy playing with the Gelli plate a couple of days ago!
Wow! Barbara, this is fantastic, beautifully detailed tutorial, thank you. Love the Hot air balloon stamps too.
Love & Hugs
Jacquie J xxx
http://jewelscardcraft.blogspot.co.uk/
The more I read your blog Barbara the less I want to go to work! Really want to stay at home and play. If only I could find a job that would pay me for not working! 🙂
I love my gelli plate! Will be trying this with it for sure. Thank you for bringing the gelli plate to c&c and showing us how to use it. I would never had attempted it without you! It is so addictive once I get my stash out to make a print I can't stop and now I have a pile of them………… Probably should use them on something.Xx
Another great card .how I look forward to your Blog every day ! made my first card on Saturday with the gelly., but still cant get it into my head how to do the different layers . will keep trying . think yesterdays card was wonderful . Must buy the set at the end of the mouth , xxp
I love the antique look of these masterpieces… Is it the colour? The composition? The stamp? … It's the amazing combination, that little bit of Barbara magic! X
I read every word Barbara, not too long at all. X
Great tutorial Barb – not one word too long. Can't wait to have time to have a go with my gelli plate, but alas, the decorating must take priority! X
It's perfick ! Love this and I almost have everything so I can definitely have a go, can't wait to order the Hot Air Balloon stamp it's fabulous, thank you again for the wonderful tutorial xx
Ooohh this is gorgeous! I always read your blog when I get to work in the morning or at lunchtime and all it makes me want to do is rush home and play in my craft room for the rest of the day! It's sooooo unfair ;-))
How could you possibly think 'too long!' Never in a million years, your fan club would wade through a missive the size of the bible! Always useful, always interesting and always fun!!! Carry on regardless…….PLEASE PLEASE
Morning Barbara, never too long when it is quality information….and the photo tutorials work really well….like a mini lesson…in fact you have started a trend and simple blogging will be a thing of the past….we will all be doing mini Barb posts…….have a good day….oh stunning project btw…love these stamps….Jo. X
Oh gosh I have GOT to try this, I love it, thanks for sharing with us. I thought it was just right in length.
Good Morning Barb!
I love this blog, and I really love the designs on the Balloon!
I don't yet have the Gelli Plate, but when I see what you have produced ….I am curious to have a go, and see what I can manage!
Love Marg
Brilliant. Love both of those backgrounds.
Beryl xx
Stunning project, I love it. xx
The Geli plate makes things very arty and must put one on my wish list. The design on the balloon is fab too.. A great card and techniques. Thank you.
Love it, simply love it. And the step-by-steps can never be too Long, so helpful! xx
Hi Barb,
What a fabulous blog and definitely not too long. I really appreciate the time you take and these "tutorials" are brilliant for us to follow you step by step. As today is really horrible outside, I think I'm just going to have to play and guess what I'll be attempting! I haven't got this balloon set, but have got your original ones so will give it a go with those. Think I'm going to batch make a load of different backgrounds too. Thanks Barb. Love Alison xx
Definitely not too long for me neither. Love reading your blog everyday. Love using my GP, and create different artwork with it. Now that I have the idea of the "leftovers", it gets even better.
Laurence xx
Love it Barbara, like everyone else I love using my Geli plate but, I don't always get usable prints but I keep trying!!
Lorna D
both projects are lovely. the colour combo is right up my street. i resally like the contrast in the 2 prints, one sharp and bright and the other somewhat more distressed and vintagey. great work……hugs xx
Hi Barbara. Another beauty. I don't have a Geli plate…yet, but the more I see you using it the more I want one! Loving the balloon stamps. Please, please don't ever think your blogs are too long, we all love them with all of the step by step pics etc, they are brilliant. Take care.
What a lovley idea i havent got an oval but got the heart stencil that comes in the club and you get the heart cut outs with it so I will have a little crafting play later today to see what I can come up with my gelli plate and paints with thank you barbara for the fabulous inspiration have a good day sheila xx
Great idea sheila 🙂
Hi Barbara, wonderful blog. Hope I can get crafting soon and try this out.
Got a gelli plate for Xmas . Might just follow instructions and have a go!!!!!!! Not used it yet.
Ooh, a twofer! Love the idea, thank you for all the pics, they are very helpful.
Love this, as always. I love my Gelli – can't think of enough things to do with it!
ooo this is fab – not got all the bits but have the gelli plate so I can improvise – wonderful! Thanks for the inspiration Barbara xx
Oooooh love this I don't have everything but would have enough to do something similar
Jackie x
Love this, will have to try I have the gelli plate and some paints but not the stamp so would have to improvise and use a different but its good to be different. Will have to try and not to think about trying I keep telling myself I will have to try I will have to try.
Hugs
CraftyJace
Probably most of us need a good step by step tutorial, so certainly not too long. The balloon stamp is lovely as are all the filigraphy ones, they have lots of uses. Had to buy some more storage today for my evergrowing stash of Clarity items, so think you are right when you say we have probably got most of the things needed. Thanks Lynne xx
Two beautiful works of art, gorgeous! x
Really lovely 'Gelli plate' art. Spent ages in the Brower's Bookshop in Portmadog (it's an art shop as well) trying to convince myself I didn't really need every shade of acrylic paint. Fortunately for my purse my daughter phoned my mobile and I had to leave the shop to talk to her. Purse saved by chattering daughter again!
Lovely Barbara,
I have the leafy swirl stencil and the small leafy stamp-I think the stamp is probably THE most used stamp I have and although I haven't got the gelli plate yet I still use the stencil-I love the design and I love this creation,
Thank you!
XxRuth
yes this is really effective thanks Barbara
Mx
fab project, thinks I need to get me a Gelliplate
x
Hi Barbara, looks fantastic, must get my Gelli out and play
I received it before Christmas and it's still in the packet.
xx
Beautiful card, I love my gelli plate x
Fabulous artwork Barbara. Pat x
Beautiful again Barbara just love it xxx
Fantastic as usual Definitely not too long, I'm always left wanting more when I come to the end!! Never read a blog before I heard about yours on c&c. Now I read it every day and it's always informative,funny and just makes me want to get in the craft room and have a go. Even on a bad day I feel better, thank you so much you are a wonderfully inspiring lady xx
Beautiful work! I have a big birthday this year and I want a Gelli plate and some Clarity stencils! I have paints and paper already, of course, and stamps too, thanks for sharing Barbara. Your work is wonderful and inspirational xx
Its not too long Barbara, I thought my current one was a too long then I realised that Blogger had just repeated some of the photos?? I think people like to see a good visual tutorial and this tells them exactly what to do. Hey not a bad Gelli Print either!!! xx
I love the gelli plate, but can definitely get stuck in a rut sometimes. Thank you for the inspiration.
Wow! That was Magic! Thanks for sharing.