SMILE!!!
Hi there!
Thanks for popping in. I’d like to take another look at those stamps and masks we showcased yesterday in our new A Moment of Clarity Facebook Live show, and thought I’d revisit that Smile project from yesterday in photos…
Here are the products. For this particular recipe, you need the masks and the stamp. The Groovi plate I am going to tackle another day, when I’ve got more time…

The 10 Feel Good Word masks are also available individually. CLICK HERE
This morning, I also want to take a closer look at how to care for your masks, so that you can use them again and again. Pick the one you want to play with.

- For this project, cut a panel of Calrity Stencil Card which will fit the word.
- Carefully peel the outer area of the mask off the carrier sheet, and lay it sticky side up on a sheet of scrap paper
- Lay the card down on the sticky mask, using the back to front wording to help you position it straight.
- Rub the back of the card
- Flip it and attach it to the scrap paper


Now let’s decide which colours we are going to use. The Designer Pads are super for this. Shenandoah is just one of eight collections. CLICK HERE TO INVESTIGATE.
The Petite toppers are the perfect size.

- Now to add colour to the letters. Pick inks which work with the card. Always easier than the other way round!
- Using a make up sponge, dab colour into the open letters.
- Dabbing is better than smearing, only because you won’t catch the mask


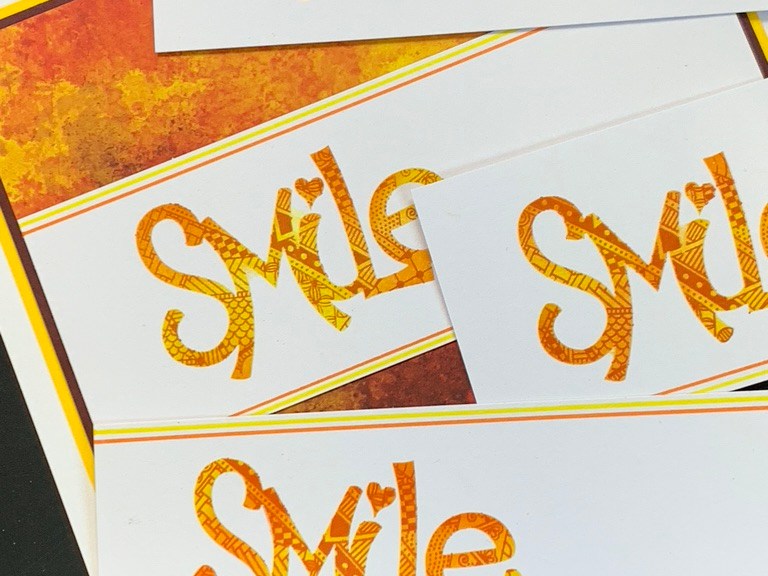
Here’s a little pointer which is worth noting. We are going to stamp the large heart stamp over the word, to fill it with pattern.
In this case, we are working with a panel, so if the heart stamps out over the edge of the mask, it doesn’t matter, because it’s just scrap paper underneath. But let’s say we want to use a larger piece of card. Then we have to protect it, cover it up. So let’s make a little protective mask :
- Fold a sheet of A4 copy paper in half.
- Place one of the masks halfway over the paper fold in the middle, to get the size of the opening required, and make registration marks with a pen
- Cut out a hole a good bit smaller. See the picture below.
- When you open up the folded paper you will have an aperture which will protect the card all around the mask.
- Secure it with a strip of masking tape at the top. That’ll do.


- Load the large heart stamp with red Archival ink
- Stamp straight over the word.
- Blot the ink on the mask with a piece of scrap paper and use a make-up sponge to gently pull the excess ink either into the letters, or away from the letters.
- Carefully peel off the mask and place it on a piece of scrap paper sticky side up.
- Now lay another piece of scrap paper down on the back. MUCH EASIER than trying to lay it down on the paper to clean.
- A tissue and blending solution will clean the permanent ink off the mask. No need to clean necessarily. It will just stain a bit, but still work fine.
- If cleaning, carefully smear the tissue in off the mask. It will drag the ink off and clean the mask.
- Don’t forget the little pieces inside the letters.

1 
2 
3 
4 
5 
6 
7 
8
Time to replace the mask back on its carrier sheet.
You will still have the word SMILE on the sheet, right?
- Carefully peel the clean mask off the copy paper and place it face down.
- Lay the carrier sheet with the Smile down on the sticky outer mask. Line it up with the sides and rub the back.
- Flip it over and replace the little pieces inside the letters with tweezers.
- Your mask is clean again, and ready to store for next time.

1 
2 
3 
4
This doesn’t take long. But it will save your masks for many many more applications. Take that little time – you will be pleased you did.
Now we have a bright Smile, and just need to assemble the card.
Let‘s add a couple of bright lines with a ruler and Perga Colours along the panel before we attach it to the background.


The Smile panel sits perfectly on the Shenandoah card, and this in turn will sit well on an 8×8 inch card blank, trimmed back.

It was a great day for Clarity yesterday – lots of smiles all round. Felt good to be back in the saddle at an exhibition – even if it was a pretend one!

The good news is, we all stayed safe and got to hang out together.
YOU all had comfy seats and could see everything. You had refreshments – whatever you fancied. Parking was FREE and so was the entry!! I got to showcase some special new products, put the stamps and masks through their paces, and demo to my heart’s content.
Win -Win.
Stay safe!
Love always
Barb xx
19 thoughts on “SMILE!!!”
Hi Barbara I really enjoyed the session yesterday. I love the stamps and masks. It is so good to see them being used. I did enjoy craft shows. I have no idea when they will happen again. I do have to say that I have never had such a good view. Thank you for blogging about it as well so it will be easy to find when I need it. Enjoy the rest of the weekend. Take care. Hugs xxx
This looks great. I have to catch up with yesterdays show, and the weeks shac. Seem to have had a week of getting nowhere fast, but luckily no stress or anything major, so hey ho, just travelling gently, one step at a time. Take care and stay safe. xxx
Love this thank you made so many notes from your tips yesterday and loved it all xx
Loved the show yesterday, beautiful stamps and masks so handy so will be investing at some stage, just had my groovi parcel come today so going to investigate that now! Have a good weekend, at least it’s bright today here ! X
Thank you Barbara and Paul for all your hard work for the show yesterday. It was excellent and I even managed to keep up with my stamp and masks nearly to the end. Better next time. Looking forward to the 19th now.
Loved every minute, spent too much but whilst waiting for the set to arrive I’ve been making a mask of my own (only individual letters)(Love). I’ve used the large stamp from Mixed Impressions Doodleology Petals and now just have to colour. It’s looking good so thank you Barbara for everything. In fact I preferred it to going to an exhibition and at the end of the day we can watch it all again for reminders xx
Absolutely loved it yesterday. I’ll be honest I wasn’t that keen on the heart stamp but watched the show and couldn’t order the set fast enough! Brilliant thank you so much xxxx
Loved watching the demo yesterday. Almost like being at Alley Pally again. Have treated myself to the stamps and masks. Can’t wait to play. x
I’ll try to catch up tomorrow. Have had a few stressful days, but things looking brighter for my mum today, so hopefully that will continue. X
Loved my afternoon at the show and your stand did make me smile. Thank you both for all your hard work.
Loved this card when you did it yesterday. Have got the masks on order – will be playing when they arrive!
Thank you for this step by step, my kit arrived today and I can’t wait to have a play tomorrow. I’ve been doing a workshop with Tina Cox today x
Thanks for doing the details, Barbara. It really adds to the exhibition.
Hello Barb, thank you for doing this additional step by step. Sometimes I actually print off your instructions and have them with the products to remember what you did. Love the bright cheerful colours, really bought a smile to my face. Take care and stay safe everyone. Bx
Loved the live show Barbara. Comfy chair, 500 others but not a crowd in sight, no queue for the loo! Thank you so much xx
The exhibition show was an amazing idea. Love the concept. It was so much better than an actual show, no aching feet and back, no hot sweats, and pushing and shoving. I hope it also proved profitable for you. I am afraid, at the moment I am trying not to spend too much, but will probably cave in. I agree with some of the people who requested the pencil extenders, I am starting to get smaller pencils now, A4 stampboard or mixed media board. I would like to add more drawing additions, a good pencil sharpener, maybe a mechanical one, more posca pens, special coloured pencil paper, more single polychromos colours, even more watercolour supplies. I think you have a lot of artists now, who would need extras. So if you could manage to extend your products it would be good idea.
Loving too how you have adapted yourselves this last year, even if it is with a lot of hard work.
Hugs, Sue
Although I watched the show this step by step is brilliant too. Thank you so much for all that you and the team at Clarity towers are doing for us. Here’s hoping you manage to have a restful weekend. xxx
Loved the session on Friday!!
You have used bright colors that made me happy and I thought of the colors of the fur of your darling Vikings!😄
Take care and see you tomorrow in the Shac!
Lots of love, Trijntje Huppel
I like the clean look of this card using the masked words. This technique could be used with a number of stamps, looking forward to having a play.